We assemble a mechanical and electric meat grinder
The meat grinder is a real kitchen helper. What would a hostess do without her, who enjoys the cooking process and loves to pamper her home with quality minced meat, sausages and baked goods in an interesting shape? However, many of us in the assembly of this device can not do without the help of her husband. This article is intended to convince you that everyone can assemble a manual or electric meat grinder!
How is a meat grinder
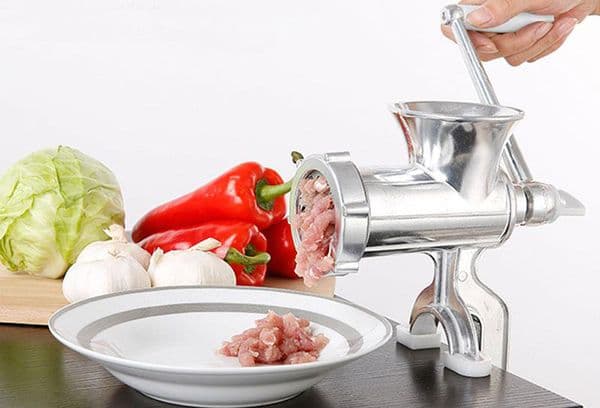
The meat grinder is a universal device that no new gadgets will supersede. With its help, not only an excellent uniform minced meat is made, but also other dishes: utensils are used to make home-made sausages and sausages, pastes, various mashed potatoes, original cookies and even pasta. A meat grinder replaces a juicer, a blender, a grater and other mechanisms, if you show imagination and stock up on special nozzles.
Many are familiar with the mechanical design of a pig-iron meat grinder from the times of the USSR. Over time, the device underwent many modifications, became more aesthetic and functional, but the essence of its device has not changed much. Therefore, the rules for assembling and maintaining the mechanical and electrical versions are almost identical.
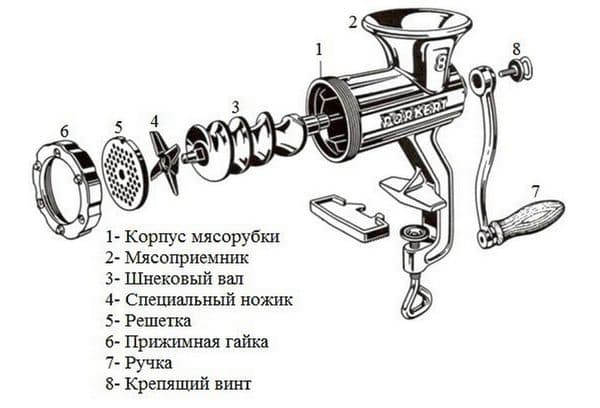
What a mechanical meat grinder consists of, all the details:
- A case with a connector for inputting meat or other products (sometimes the meat receiver is inserted separately into the case).
- Handle and screw - are attached to the body to rotate the mechanism.
- The screw is a spiral element that is inserted into the body and ensures the movement of products to the knives of the meat grinder.
- Knife - a four-blade or disk-shaped small element responsible for cutting.
- The grate is a round disk with holes, it can be either regular or curly and is needed to control the degree of grinding and the shape of the minced meat / dough.
- Round clamping piece for the integrity of the entire structure.
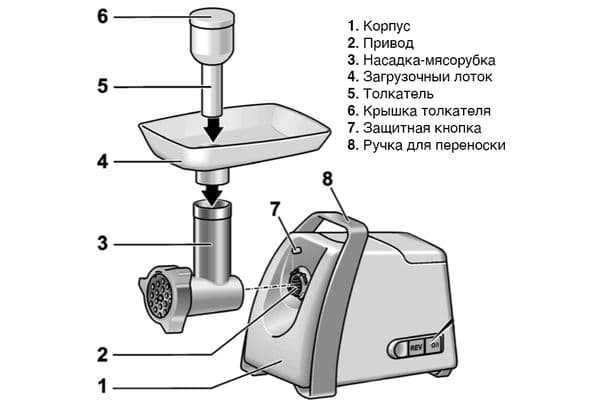
Electronic versions are equipped with a drive and a special button control panel or an on / off toggle switch. Pressing the button replaces the manual grinding process. Also, in modern small-format meat grinders, the case is made of special food-grade plastic.
The models are lighter and more attractive, unlike the old ones, but otherwise they are identical. More powerful appliances are usually covered with a steel case. In any case, due to the motor, such a device weighs more and is larger in size than the Soviet model. In principle, the versions are identical.
The advantage of mechanical models is network independence, a longer life, but it’s hard to work manually with large volumes of products. Here the automatic analogue comes to the rescue.
Advanced models of meat grinders from "Redmond", "Axion", "Polaris", "Scarlet", "Bosch" and others. Also include additional elements for making home-made sausages and other dishes. These are conical nozzles on the body and special washers instead of the grill and four-blade knives.
For sausages, grills of three or four holes 12 mm in diameter are sold; for sausage stuffing, purchase grills with 8 mm connectors. The paste lattices are the smallest, their diameter is 3 mm. The standard kit part has a hole diameter of 4-4.5 mm.

Assembling the device: stages
If the manual for the old mechanical meat grinder was lost, do not worry. Even having examined all the details, it is easy to guess what is attached to and how it works. Refer to this step-by-step instruction to make sure the conclusions are correct.
How to assemble a mechanical Soviet meat grinder:
- Insert the screw part into the housing so that the cone for fastening is in front and the place for fastening the handle is in the back.
- Inspect the knife. It is important to install this part with the right side to the grill - flat. To glide, the knife is polished to a shine. It is the incorrect installation of the knife that is the most common assembly problem. If the products are not cut well, then you have to disassemble the device and reinstall the knife.
- In the protrusion on the main body there is a connector for installing the grill. There is a special groove on this part. Screw in the grill so that it fits snugly next to the cutting element.
- Now close everything with the clamping device and connect the handle to rotate the mechanism.
- To prevent the mechanical meat grinder from sliding on the table, fix its body with a special clamp that is built directly into the body. A piece of cloth or newspaper can be placed under the foot.
- Done, now put the products in the meat receptacle and twist the handle to chop them. At the exit, substitute the plate to collect the stuffing.
In post-Soviet mechanical meat grinders, not only clamp clamps were made, but also vacuum mounts to the table - the surface under them should be smooth, clean and dry. But if the rubber suction cup has lost elasticity, it will not be possible to fix the device in any way. Another nuance is the plastic sleeve, which replaced the bulge on the Soviet screws on the back.
It is needed to improve the auger sliding on the housing seat. This sleeve is put on first, then only the spiral part is placed in the device. The gland usually has a protrusion that should align with the groove in the housing.
The assembly of the electric meat grinder is carried out in the same order as the mechanical one. Some differences:
- The screw part is connected to the electrical part. Insert it into the connector and turn it counterclockwise until it clicks (for Mulinex, Bosch models). If the screw shaft is loose, the motor will not be able to turn it.
- The kit comes with special trays for loading products. They are convenient for immersing a large number of ingredients at the same time. Just insert the element into the socket of the main body before starting work.
Tip
For stability of the body of a cheap electric meat grinder, put dense fabrics under it during operation.
If the mechanism is assembled incorrectly, then the products will not be grinded, but will come back through the meat receiver. The models are accompanied by an assembly diagram indicating all the details. Study it, as some meat grinders may have their own characteristics.
Usage Tips
Working with a meat grinder has a number of dangers. Since childhood, everyone knows that you can’t stick your fingers in the meat receptacle.
purityis.decorexpro.com/en/ recommends dismantling the appliance immediately after use, as food particles may dry out or even rot, making it difficult to wash expensive utensils.
How to disassemble a meat grinder? Proceed in reverse order:
- Remove the removable meat box.
- Unscrew the handle.
- Remove the clamping nut. To make the locking ring come loose easily, put a towel over it.
- Remove all internal parts: grill, knife, screw shaft.
Now thoroughly rinse all elements, especially the grill holes. Use a long-bristle brush and detergent to thoroughly clean small holes.

Important
Always wash the meat grinder disassembled, especially the electric one, so that there is no short circuit. Allow parts to dry before assembly. In the manual model, water will lead to rust, in the network one it will cause the engine to burn out and the entire device to fail.
Competent care extends the life of cooking equipment, while illiterate significantly affects the quality of the stuffing. Listen to these tips for caring for your appliance:
- Keep the meat grinder disassembled and dry, assemble it immediately before use.
- Periodically maintain the sharpness of the cutting element of the meat grinder.It is easy to do it yourself with a sandpaper sheet or sharpener.
- After washing, grille and knife must be wiped dry and, if possible, lubricated with liquid paraffin - this will protect parts from rust, and the device will work better.
A meat grinder is not the most difficult kitchen appliance; all housewives can deal with its use. Having assembled and disassembled it once, you will never again experience difficulties.
A good instruction for lonely women-blondes whom the mother did not teach to use a meat grinder. While they were painting their nails and putting makeup on, to get through the village-street. And to cuddle, during a break from spitting husks from seeds! Or, in which the husband is a handshake!