How to fix an LED bulb with e27, e14 and g13 socket
Content:
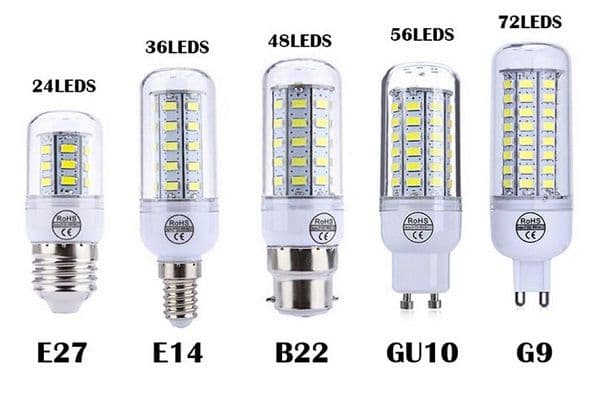
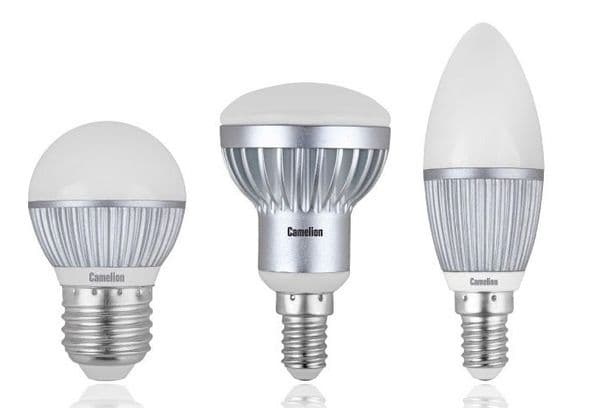
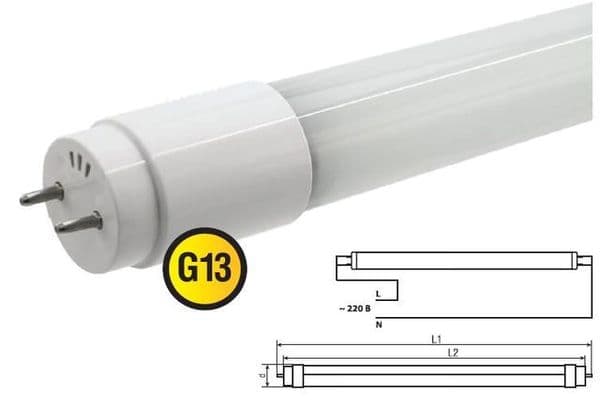
LED lamps are available in various shapes and on various socles. Table lamps and ceiling chandeliers are usually inserted devices with a screw-shaped base e27 or e14. The latter is thinner than the first. Recently, T8 LED lamps with g13 base have been inserted into a number of table lamps, aquariums and office chandeliers - they look like a tube with pin pins from both ends.
These models replace gas-discharge analogs, which spend more energy, fail more quickly, are more expensive and, in addition, contain harmful components that complicate their disposal.
If you carefully disassemble the LED bulb, it can be repaired, so that it will last for more than one year.
The device of any LED lamp
Any light bulb of this type consists of a socle with contacts, a housing and a matte diffuser (in modern versions - a plastic dome or tube).
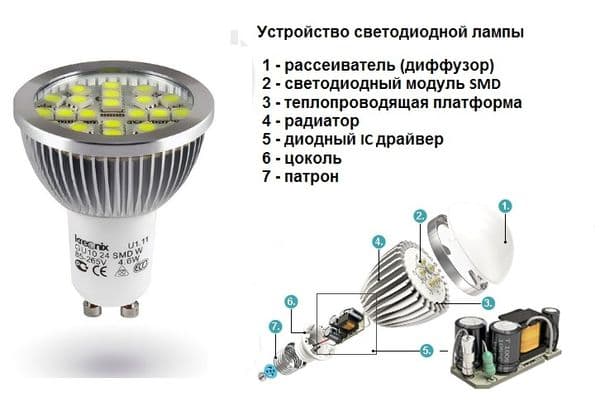
The internal structure of the LED lamp:
- a platform with diodes connected in series;
- heat sink radiator protecting the platform from overheating;
- wires transmitting power (“plus” and “minus”), one of them is brought down to the contact, the other is brought under the base;
- a driver that rectifies alternating current and reduces the voltage of 220 volts to acceptable for LEDs;
- capacitors that absorb voltage surges and protect the device from explosion and burnout (normal capacity - 250, ideal - 800 microfarads).
Why the lamp does not light
Most often, the lamp stops burning not at all due to a total breakdown on the board or a capacitor explosion (which also happens), but because of a banal open circuit. One of the diodes on the platform burns out for one reason or another. These elements are connected in series. Accordingly, the circuit breaks, and all the diodes stop burning. The same principle of work for Christmas garlands. Try to unscrew one diode, and the whole chain goes out.
Capacitor explosion is a relatively rare cause. It is typical for cheap brands, where there are elements with insufficient capacity, about 200-250 microfarads.
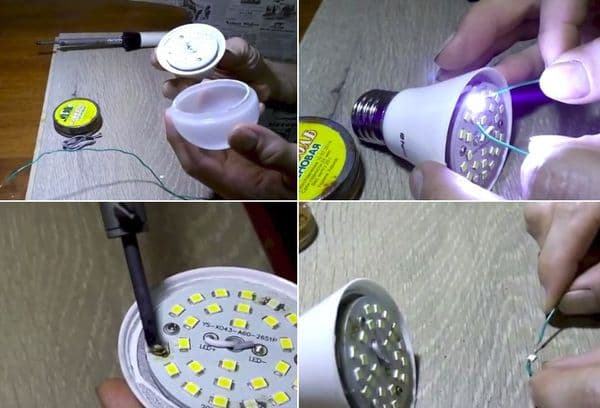
How to fix
A burnt out diode is usually immediately noticeable: a black spot appears on it. If there is no certainty, it is better to check each element. This is done either with an ammeter or a battery with wiring attached to its ends. In turn, each of the diodes closes until faulty ones are determined.
To restore the circuit, the blown diode must be removed and the circuit closed in another way or the element replaced. Spare diodes of the required sample are sold in radio components, as well as on Chinese trading floors, for example, "Aliexpress". Resource purityis.decorexpro.com/en/ recalls that the diodes are available in different qualities, and they should be taken from a trusted seller.
The most likely way out is to set the jumper in one of two ways:
- solder the short and thin wire by connecting the “+” and “-” of the contact pad under the remote diode;
- drip first with flux, and then solder so as to occupy the edges of the contact pad.
Tip
When using a soldering iron, be careful not to melt the light bulb housing or touch working diodes.
How to disassemble a lamp
The specific method depends on the model and brand of the LED lamp, purityis.decorexpro.com/en/ magazine offers you to familiarize yourself with typical approaches.
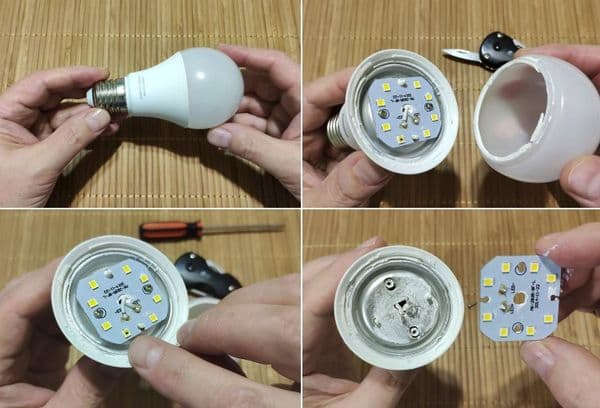
Lamps with socket e27 and e14
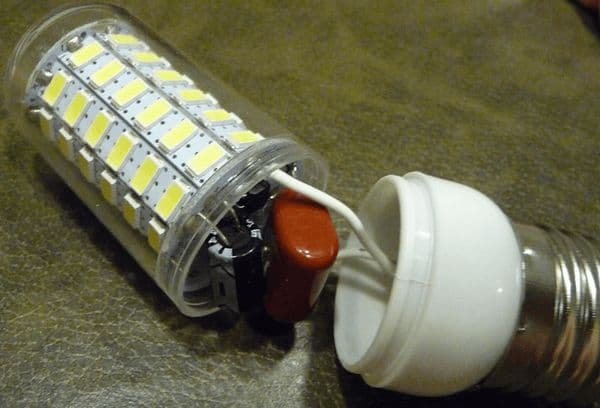
If the diffuser is made of plastic, then the procedure does not take much time:
- Remove the diffuser. In case of fixing with a spike - squeeze slightly and separate from the body.If the part is held by silicone sealant (in cheaper models, including Ecola) - hold with a scalpel or clerical knife, cutting the paste, then remove the dome.
- Solder, heat with a soldering iron, two wires in the center of the platform with diodes.
- Loosen the screws or cut the silicone layer around the platform.
- Turn the bulb on its side, pry off the plug on the end of the base with a knife, remove it and put it aside.
- Bend the wire that appears.
- Gently pull or pry with a knife and carefully raise the platform with the diodes. In many models, it is merged with a radiator. In other cases, you must first remove the platform, and then raise the radiator.
- Pull or cut (the first option is preferable) wire, wound under the body.
- Remove the board with driver and capacitors.
To enhance the brightness of the LED lamp, you can try to replace the diode platform by soldering wires to the bundle of diode strips. It is important to lubricate the bottom of the platform with thermal grease, and replace the capacitors with more capacious ones. However, tapes inserted into a plastic diffuser will inevitably overheat it, so such a lamp will most likely last a short time. The advantage of this method is that segments of the tape are connected in parallel, and if one of them burns out, the rest will continue to work.
Lamps with g13 socket
The main difference between these devices is the direct rather than circular arrangement of the diodes, otherwise the design is of the same type. To disassemble it, you need:
- Loosen the screws or gently warm the end cap (and the silicone layer underneath).
- Remove the cap with the contacts without breaking the wire.
- If the diffuser is an independent part and is mounted on an aluminum base, pull it out and remove it. If the mount is solid, then you need to remove the second end contact similarly to the first.
- Unsolder wires from contacts.
- Take out the pad with diodes. Usually, the driver and capacitors are attached to it from below.
Important
If you do not warm up the silicone clutch or act carelessly, the end cap will burst. This is especially dangerous for aquarium lamps, as they operate in constant humidity.
All described methods are suitable for cases with plastic diffusers. There are still LED bulbs with glass cases on the market. Unfortunately, any attempt to disassemble such a design will almost certainly lead to breakage: the glass will crack. It is dangerous to repair such devices, it is easy to cut yourself. Therefore, it makes sense to either replace them with a new lamp, or try to find a plastic diffuser and put on the old case.
Replacing halogen spotlights with LED
Halogen lamps heat up a lot and consume a lot of energy, so it makes sense to replace them with LED ones.
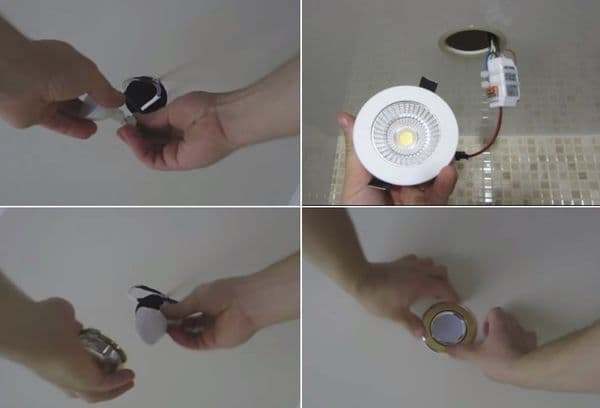
How to replace a halogen lamp:
- Press on the halogen lamp and find out which side the locking bracket is on.
- Push the lamp into the space above the ceiling in the opposite direction from the bracket.
- Using two hooks in turn, hook the spacer brackets (“ears”).
- Press out springs and remove cartridge.
- Pull out the lamp.
- Press the lock and release the base. Lamps under the g-base were mounted in the old-style ceilings
- Insert the LED lamp with the same base, for example MR ONLIGHT
- Insert it into the cartridge.
- Mount the entire structure back into the hole in the ceiling.
The ideal option, of course, is to re-solder the socket to the GX53 option (in the line of the same “Onlayt”), so as not to later remove the cartridge, but simply replace the lamp by turning half a turn. However, it makes sense to entrust such an operation to an electrician, especially since not one or two sockets will have to be replaced, but much more.
LED lamps are considered today the most successful solution for both residential and office premises. Thanks to the diffuser, the LED gives a soft, pleasant to the eyes light, while it is quite bright.A big advantage is the lack of ripple, economical energy consumption and the ability to repair the lamp by replacing just one diode or simply putting a “seal” in its place. Therefore, you should not refuse from LED table lamps - you can’t replace the light bulb in them, but it is easy to rearrange the diodes by purchasing LED strips in advance, which are quite inexpensive.